Blog
5 Common Reasons Why Your Dryer Is Not Heating: Troubleshooting Guide by Oceanside Appliance Repairs

Is your dryer running but not producing heat? At Oceanside Appliance Repairs, we understand how frustrating this common problem can be. This comprehensive guide addresses the 5 most common reasons why your dryer isn’t heating, providing practical troubleshooting solutions to get your appliance working efficiently again.
Overview: 5 Common Causes of a Non-Heating Dryer
When your dryer runs but fails to generate heat, these are the five most likely culprits:
- Tripped Circuit Breaker or Blown Fuse
- Clogged Lint Filter
- Blocked Dryer Vent
- Blown Thermal Fuse
- Faulty Heating Element
Let’s examine each of these issues in detail to help you diagnose and potentially fix the problem yourself.
Reason #1: Circuit Breaker Problems and Electrical Overloads
Dryers use a lot of power, and if the circuit is overloaded, the circuit breaker will trip (or the fuse will blow) to prevent overheating and potential fires. Understanding how to deal with tripped circuit breakers and blown fuses is crucial for home safety. It prevents electrical hazards, protects appliances, and ensures a stable power supply.
How to Handle a Tripped Circuit Breaker or Blown Fuse:
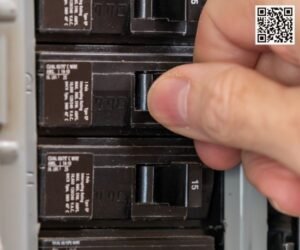
- Locate the Breaker Box/Fuse Box This is usually a gray metal box, often in a utility room, basement, or garage.
- Identify the Tripped Breaker/Blown Fuse For a circuit breaker, look for a switch that’s in the ‘off’ position or in a middle position between ‘on’ and ‘off.’ For a fuse, look for a broken wire inside the glass or a blackened appearance.
- Reset the Circuit Breaker Flip the breaker switch completely to the ‘off’ position, and then flip it back to the ‘on’ position.
- Replace the Fuse (if blown) Ensure you replace a blown fuse with one of the exact same amperage.
- Reduce the Load Overloading a circuit is a common cause of tripped breakers and blown fuses. Try not to run the dryer at the same time as other high-power appliances on the same circuit.
If the circuit breaker trips or the fuse blows repeatedly, even when you’re not using other appliances on the same circuit, there may be a more serious underlying electrical problem. In this case, it’s best to consult a qualified electrician like those at Oceanside Appliance Repairs.
Reason #2: Lint Filter Maintenance Issues
The lint filter traps lint and debris from your clothes during the drying process. If it’s clogged, it restricts airflow, which causes the dryer to work harder, overheat, and dry inefficiently. Cleaning the lint filter after every load is crucial for dryer efficiency and safety. A clogged filter can increase drying time and pose a fire hazard.

How to Clean a Lint Filter:
- Locate the Lint Filter The lint filter is usually located inside the dryer drum (often near the door) or on top of the dryer.
- Remove the Lint Remove the lint after every load. Simply pull the lint off with your fingers.
- Deep Clean the Filter Regularly Every few months, deep clean the filter with warm, soapy water and a soft brush to remove any buildup from detergents or fabric softeners.
- Dry the Filter Make sure the filter is completely dry before replacing it in the dryer.
- Check the Lint Filter Housing Use a vacuum cleaner with a hose attachment to clean out any lint that may have accumulated in the lint filter housing.
Reason #3: Dryer Vent Blockage
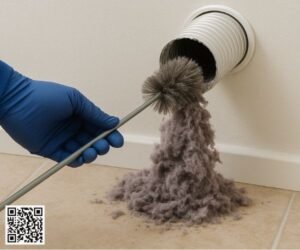
The dryer vent is a duct that carries hot, moist air from the dryer to the outside. Over time, lint can accumulate in the vent, restricting airflow and causing the dryer to overheat. A blocked vent is a fire hazard and reduces drying efficiency. Regularly cleaning the dryer vent is essential for safety and efficiency. Aim to clean it at least once a year, or more frequently if you notice your dryer taking longer to dry clothes.
How to Clean a Dryer Vent:
- Gather Supplies You’ll need a dryer vent cleaning kit (or a long, flexible brush), a vacuum cleaner with a hose attachment, and a screwdriver.
- Disconnect the Dryer Unplug the dryer from the power outlet. If it’s a gas dryer, also disconnect the gas line.
- Detach the Vent Use a screwdriver to detach the vent from the back of the dryer and from the wall.
- Clean the Vent Insert the dryer vent cleaning brush into the vent and push it through, twisting as you go, to loosen the lint. Then, use the vacuum cleaner to remove the loosened lint.
- Clean the Exterior Vent Go outside and remove the cover from the exterior vent. Use the brush and vacuum to remove any lint buildup.
Reason #4: Blown Thermal Fuse
The thermal fuse is a safety device that protects the dryer from overheating. It’s a one-time-use component that blows (breaks the circuit) when the dryer gets too hot, usually due to restricted airflow. Once blown, it must be replaced. Unlike a circuit breaker that can be reset, a thermal fuse is designed to break the circuit permanently when a certain temperature is reached.

How to Test a Thermal Fuse:
- Locate the Thermal Fuse The thermal fuse is typically located on the blower housing or near the heating element. You may need to remove a panel on the back of the dryer to access it.
- Disconnect the Dryer Unplug the dryer from the power outlet.
- Remove the Fuse Disconnect the wires connected to the thermal fuse. You may need a screwdriver to remove it.
- Test for Continuity Set your multimeter to the continuity setting. Touch the multimeter probes to the terminals of the thermal fuse. If the multimeter shows no continuity, the fuse is blown and needs to be replaced. If it shows continuity, the fuse is good.
If the thermal fuse is blown, it indicates that the dryer has overheated. Before replacing the fuse, it’s crucial to identify and correct the underlying cause of the overheating, such as a clogged vent or lint filter. Otherwise, the new fuse will likely blow again.
Reason #5: Defective Heating Element
The heating element is responsible for generating the heat inside the dryer. It’s an electrical component that heats up when electricity passes through it. If the heating element is broken or burned out, the dryer won’t produce heat.

How to Test a Heating Element:
- Locate the Heating Element The heating element is usually located in the back of the dryer, inside a metal housing. You’ll need to remove a panel to access it.
- Disconnect the Dryer Unplug the dryer from the power outlet.
- Access the Heating Element Terminals Remove the wires connected to the heating element terminals.
- Inspect for Damage Visually inspect the heating element for any signs of damage, such as breaks or burns.
- Test for Continuity Set your multimeter to the continuity setting. Touch the multimeter probes to the heating element terminals. If the multimeter shows continuity, the element is likely good. If it shows no continuity, the element is broken and needs to be replaced.
If the heating element is broken, it will need to be replaced. Make sure to purchase a replacement heating element that is compatible with your dryer model.
Dryer Troubleshooting Summary
| Problem | Testing | Solution |
|---|---|---|
| 1. Tripped Circuit Breaker/Fuse | Check the breaker box/fuse box for tripped breakers or blown fuses. | Reset the breaker or replace the fuse. Avoid overloading the circuit. |
| 2. Clogged Lint Filter | Visually inspect the lint filter for lint buildup. | Clean the lint filter after every load. |
| 3. Blocked Vent | Check the vent for obstructions. | Clean the vent at least once a year. |
| 4. Thermal Fuse | Test the fuse for continuity using a multimeter. | Replace the fuse if it’s blown. Identify and correct the cause of overheating. |
| 5. Heating Element | Visually inspect the element for breaks or burns. Test for continuity using a multimeter. | Replace the element if it’s broken. |
Frequently Asked Questions: Dryer Not Heating
Is it safe to use a dryer that’s not heating properly?
No, it’s not recommended. A dryer that’s not heating properly can indicate underlying issues like a clogged vent, which can be a fire hazard. It’s best to diagnose and fix the problem before using the dryer again.
How often should I clean my dryer vent?
It’s recommended to clean your dryer vent at least once a year, or more frequently if you notice reduced airflow or longer drying times.
Can I replace the thermal fuse myself?
Yes, you can replace the thermal fuse yourself if you’re comfortable working with basic tools and following safety precautions. Be sure to disconnect the dryer from the power source before attempting any repairs.
How do I know if my heating element is bad?
You can test the heating element for continuity using a multimeter. If the multimeter shows no continuity, the element is likely bad and needs to be replaced.
Why does my dryer run but not heat up?
There are several potential causes, including a tripped circuit breaker, a clogged lint filter, a blocked vent, a blown thermal fuse, or a faulty heating element.
Trust Oceanside Appliance Repairs for All Your Dryer Repair Needs
At Oceanside Appliance Repairs, we’re committed to helping local homeowners maintain their dryers for optimal performance and safety. If you’re experiencing any issues with your dryer that you can’t resolve using the troubleshooting tips above, our team of certified appliance technicians is ready to help.
We provide prompt, reliable Oceanside dryer repair services throughout the Oceanside area, using quality parts and offering fair, transparent pricing. Contact Oceanside Appliance Repairs today at 760-496-5437 to schedule a service appointment and get your dryer back to peak performance.
Remember, regular maintenance is the key to extending the life of your dryer and preventing costly repairs. Follow the tips in this guide to keep your dryer running efficiently and safely for years to come.